Choosing a Strategy and Managing It
A strategy is only as good as the view behind it. Learn how to match a strategy to bullish, bearish or neutral views, size the position for survival, and adjust or exit when you are wrong.
- ·Matching strategy to view
- ·Defined risk first for beginners
- ·Position sizing
- ·When to take profit
- ·Adjusting a losing trade
- ·Knowing when to walk away
You have spent this whole course meeting strategies one at a time, learning each by its payoff shape and its three numbers. Now comes the part that decides whether any of it makes you money: choosing the right one for the moment and managing it once it is on. A strategy is just a tool, and the best tool is the one that fits the job and the size of your account. This closing chapter pulls everything together. It maps your market view to a sensible structure, explains why a beginner should start with defined risk, shows how to size a position so a single bad trade cannot end your trading, and lays out clear rules for taking profit, adjusting, and walking away. We finish with a checklist you can run before every trade.
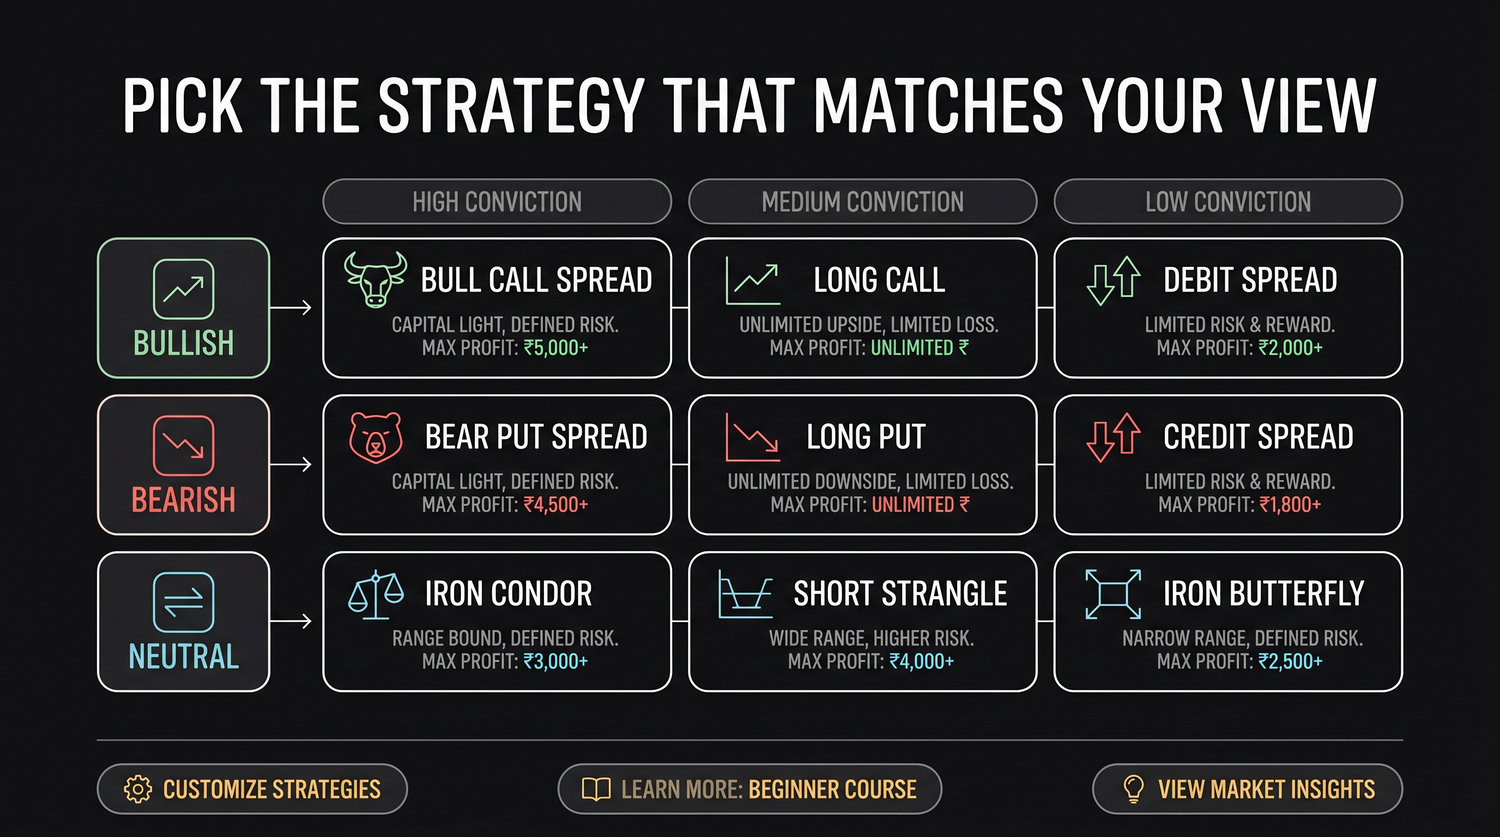
Start with your view, then pick the shape
Every strategy in this course answers a different opinion about where RELIANCE goes next. So the first question is never which strategy, it is what do you actually think will happen. Are you bullish, bearish, expecting calm, or bracing for a big move in either direction? Once that is honest and specific, the structure almost picks itself.
Here is the same idea as a table, using the real RELIANCE numbers from across the course so you can compare the three numbers side by side.
| Your view | Sensible structure | Breakeven(s) | Max profit | Max loss |
|---|---|---|---|---|
| Mildly bullish | Bull call spread | 1336 | Rs 12,205 | Rs 7,795 |
| Bullish, want a credit | Bull put spread | 1304 | Rs 8,210 | Rs 11,790 |
| Mildly bearish | Bear put spread | 1304 | Rs 11,790 | Rs 8,210 |
| Bearish, want a credit | Bear call spread | 1336 | Rs 7,795 | Rs 12,205 |
| Neutral, wide range | Iron condor | 1262 and 1378 | Rs 8,948 | Rs 11,052 |
| Neutral, pins a strike | Iron fly | 1288 and 1352 | Rs 16,005 | Rs 3,995 |
| Big move, either way | Long straddle | 1258 and 1382 | Unlimited | Rs 31,180 |
| Big move, cheaper | Long strangle | 1250 and 1390 | Unlimited | Rs 15,176 |
Read this table as a menu, not a ranking. A bull call spread is not better than an iron condor; they answer different views. The discipline is to let your honest opinion choose the row, rather than picking a strategy you like and then inventing a view to justify it.
The order of decisions matters. First form a clear, specific view on RELIANCE. Then choose the structure whose payoff shape rewards that exact view. Choosing the strategy first and bending your view to fit it is the most common way beginners lose money on perfectly good structures.
Defined risk first, always
If you remember one rule from this entire course, make it this. As a beginner you should trade defined-risk structures, the ones whose maximum loss is a fixed, known number printed on the chart before you ever enter.
Look back at the table. The bull call spread risks Rs 7,795 and not a rupee more. The iron condor risks Rs 11,052, the iron fly just Rs 3,995. Every one of those losses is capped, because a bought option somewhere caps it. You can lose your maximum, but you can never lose a surprise.
Contrast that with the structures this course flagged with warnings: the short straddle and short strangle, the call ratio spread, the long synthetic future, the short put inside a jade lizard. Each of those carries an undefined or unlimited loss on at least one side. They can pay well and experienced traders use them, but a single violent move in RELIANCE can cost many times the premium you collected. That is not where a beginner should learn.
Strategies with unlimited or open-ended loss, short straddles and strangles, ratio spreads with a naked leg, synthetic futures, and bare short puts, can lose far more than you collect and have ended trading accounts in a single session. Master defined-risk structures, where the worst case is printed on the chart, before you go anywhere near them.
There is a second reason defined risk matters for beginners: it lets you size correctly, because you know the exact worst case in advance. You cannot size a position sensibly if you do not know how much it can lose, and undefined-risk trades hide that number from you.
Size every position to survive
The fastest way to fail is not picking wrong strategies. It is putting too much on one trade and being wiped out before your edge has time to work. Position sizing is survival.
The simple rule professionals use is to risk only a small slice of your account on any single trade, often one to two percent. With defined risk this is easy arithmetic, because your maximum loss is known.
- Suppose your account is Rs 5,00,000 and you cap risk at two percent, which is Rs 10,000 per trade.
- A bull call spread on RELIANCE risks Rs 7,795 for one lot. One lot fits comfortably under your Rs 10,000 limit, so one lot is your size.
- An iron condor risking Rs 11,052 for one lot is already slightly over the limit, so you either trade it on a smaller account allocation or choose a structure that fits.
The point is not the exact percentage. It is that your size flows from your maximum loss, not from how confident you feel. Confidence is the worst possible sizing input, because you feel most confident right before the trades that hurt most.
Work backwards from your loss limit. Decide the rupee amount you are willing to lose on the trade, then divide by the strategy's max loss per lot to get your number of lots. If the answer is less than one lot, the trade is too big for your account and you skip it. This one habit prevents most account-ending mistakes.
Manage the trade: profit, adjust, exit
A position is not finished when you open it. Decide your management rules before you enter, while you are calm, because once money is moving your judgement gets worse.
When to take profit. You do not need to hold a credit trade to expiry to win. Many traders close a defined-risk credit structure once it has captured a large part of its maximum profit, often around half to three quarters, rather than squeezing the last rupees while exposed to a reversal. Taking a good profit early frees your capital and removes risk you no longer need to carry. For a debit spread, the same idea applies: if the move you wanted has mostly happened and the position is near its max profit well before expiry, closing it locks in the win.
When to adjust. Adjusting means changing legs to repair a trade that has moved against you, for example rolling an untested side of an iron condor closer to collect more credit, or moving a threatened short strike further away. Adjusting is a real skill, but it is also where beginners get into trouble by throwing good money after bad. As a beginner, prefer simple management over clever repairs. An adjustment that adds risk to rescue a loser is often worse than simply accepting the defined loss you signed up for.
When to exit. Exit when the reason for the trade is gone, when your view has changed, or when the position hits a loss level you set in advance. With defined risk you always have the option to do nothing and let the worst case play out, because it is capped, but exiting early to preserve capital is usually wiser than watching a trade grind to its full loss. Never widen your risk to avoid taking a loss; that is how a small defined loss turns into an undefined one.
Decide your exits before you enter. Write down the profit level where you will close, the loss level where you will stop, and the date by which you will be out regardless. A plan made in calm beats a decision made in panic every single time.
Your pre-trade checklist
Run this list before you place any strategy. If you cannot answer every line, the trade is not ready.
- View. Can I state in one plain sentence what I expect RELIANCE to do and roughly by when?
- Shape. Does this structure's payoff actually reward that view, and have I looked at its chart?
- Three numbers. Do I know the breakeven, the maximum profit, and the maximum loss before I enter?
- Defined risk. Is my worst case capped and known? If not, do I truly understand and accept an open-ended loss?
- Size. Does my number of lots come from my loss limit, keeping risk to a small slice of my account?
- Exits. Have I written down where I take profit, where I cut the loss, and the date I am out?
- Rehearsal. Have I built it in the strategy builder and, if it is new to me, run it in sandbox trading (analyzer mode in OpenAlgo) first?
The traders who last are rarely the ones with the cleverest strategies. They are the ones who match a simple structure to a clear view, keep their risk defined, size small enough to survive a losing streak, and follow their own exit plan. Every tool in this course works inside that discipline and none of it works without it.
That is the whole craft in miniature. You now know the named structures, how to read any payoff by its shape and its three numbers, and how to choose, size, and manage a trade with honest respect for its risk. Keep starting from defined-risk structures, keep your size small, and keep rehearsing in the strategy builder before real money is on the line. The strategies will always be there. Protecting your capital so you are still trading next year is the part that makes them matter.