Buy, Sell, Short & Cover
The four reserved arrays that turn an idea into a system - and how AmiBroker reads them.
- ·Buy / Sell / Short / Cover
- ·Long-only vs long-short
- ·Signals are true/false arrays
- ·BuyPrice & friends
- ·From indicator to system
- ·The trade lifecycle
Everything we have built so far was for looking - indicators that draw lines, scanners that list candidates. This chapter is the hinge of the whole course. It is the moment an indicator stops being a picture and becomes a system - something AmiBroker can buy and sell with, and then backtest over years of history.
Buy, Sell, Short and Cover are reserved names. AmiBroker's backtester looks for exactly these four arrays, which is why a system "just works" the moment you assign them.
The surprising part is how little new code it takes. If you can already calculate a crossover, you are four short lines away from a tradable strategy. The trick is knowing four special words that AmiBroker is always listening for.
The four reserved arrays
AmiBroker reserves four variable names as trade instructions. When you assign values to them, the backtester reads them as orders:
Buy- open a long position (enter the market expecting price to rise).Sell- close that long position (exit the trade you opened withBuy).Short- open a short position (enter expecting price to fall).Cover- close that short position (exit the trade you opened withShort).
These names are case-insensitive and built in - you never declare them, you just assign to them. Every other variable you make (Fast, rs, avg) is yours to name freely, but these four are AmiBroker's. Think of them as four switches the engine checks at every bar.
Buy and Sell are a pair: Buy opens a long, Sell closes it. Short and Cover are the other pair: Short opens a short, Cover closes it. Sell does not open a short, and Cover does not open a long - each array has exactly one job.
Signals are true/false arrays
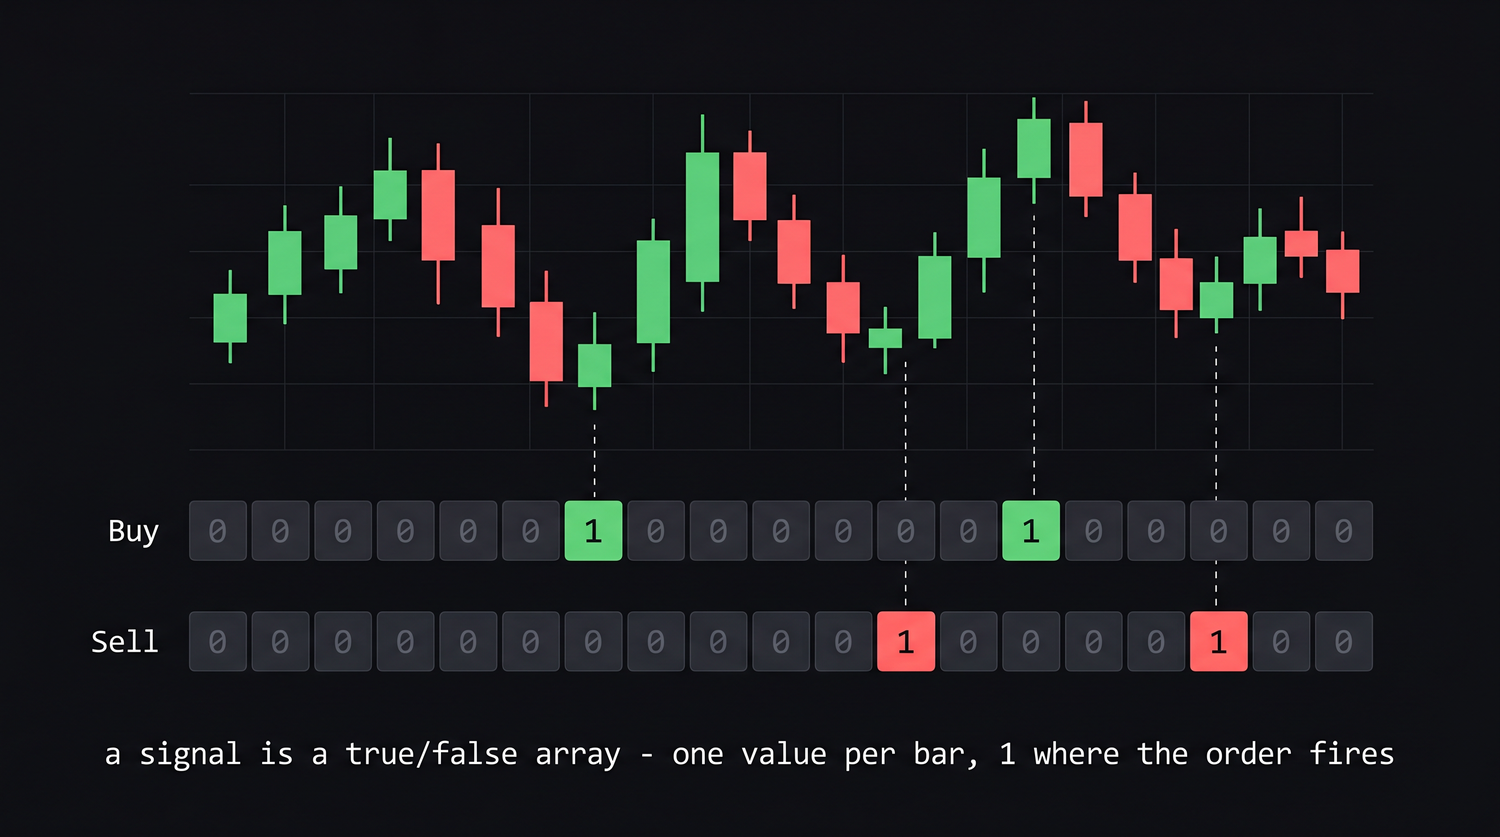
Here is the idea that makes it all work, and it connects straight back to Chapter 3: a signal is just an array of true/false values, one per bar. Where the array is True (1), that is a bar where the order fires. Where it is False (0), nothing happens.
So Buy is not a single event - it is a whole column running the length of the chart, mostly zeros with a 1 on each bar where you want to enter long. You build that column the same way you built any condition in Chapter 8: with a comparison or a function that returns true/false. Cross(Fast, Slow) is exactly such a function - it returns True on the single bar where Fast crosses above Slow, and False everywhere else.
See the signal arrays fire
Buy and Sell are just true/false columns running the length of the chart. Cross(Fast, Slow) puts a single True on the bar Fast crosses above Slow, and the mirror Cross(Slow, Fast) puts one on the bar it crosses back below - false everywhere else:
| Bar | 1 | 2 | 3 | 4 | 5 | 6 |
|---|---|---|---|---|---|---|
Fast |
99 | 101 | 103 | 102 | 100 | 101 |
Slow |
101 | 101 | 101 | 101 | 101 | 101 |
Buy = Cross(Fast, Slow) |
F | F | T | F | F | F |
Sell = Cross(Slow, Fast) |
F | F | F | F | T | F |
There is exactly one Buy (bar 3, where Fast pushes above Slow) and one Sell (bar 5, where it drops back below) - everywhere else the arrays are 0.
From indicator to system
Let us take the two-line EMA indicator from earlier and turn it into a system. Grounded in the author's Simple EMA Crossover Strategy.afl, here is the whole thing:
_SECTION_BEGIN("Simple EMA Crossover System");

// --- the indicator part (what we already know) ---
Fast = EMA(Close, 10);   // fast 10-bar EMA
Slow = EMA(Close, 20);   // slow 20-bar EMA

Plot(Close, "Price", colorDefault, styleCandle);
Plot(Fast, "Fast EMA", colorBlue, styleLine);
Plot(Slow, "Slow EMA", colorRed,  styleLine);

// --- the system part (the four magic words) ---
Buy  = Cross(Fast, Slow);   // fast crosses ABOVE slow -> go long
Sell = Cross(Slow, Fast);   // fast crosses BELOW slow -> exit long

_SECTION_END();
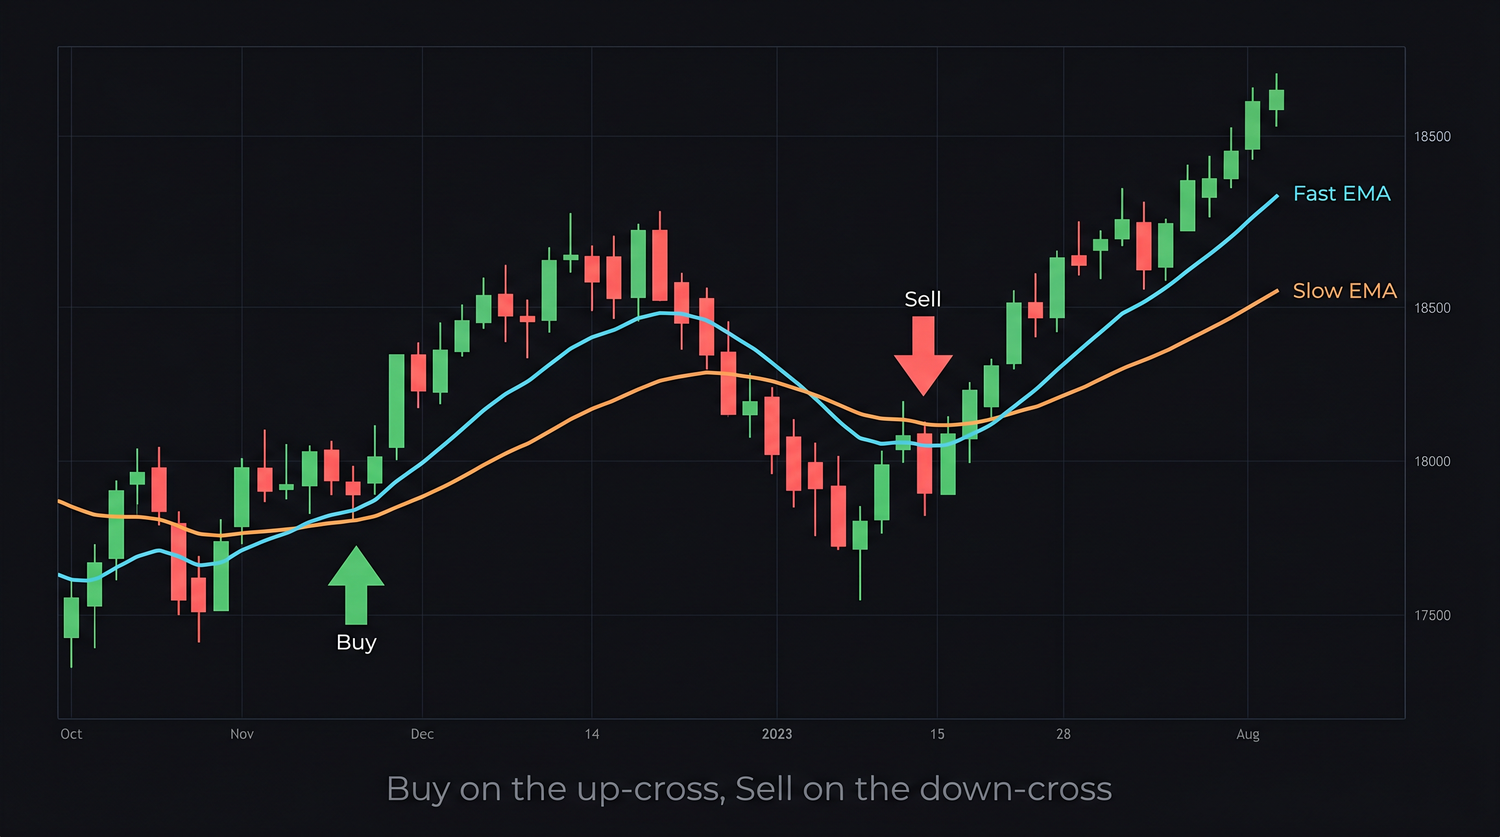
Read the last two lines in plain English. "Buy when the fast EMA crosses above the slow EMA. Sell when it crosses back below." That is a complete long-only trading system. The first half draws the chart so you can see what is happening; the second half is what the backtester will trade.
Notice we did the heavy lifting earlier - Cross already gives us a clean true/false array. We simply pointed the reserved word Buy at it.
Long-only vs long-short
The system above is long-only: it buys, then sells to go flat, and waits in cash for the next signal. Many traders prefer that simplicity, especially for equities.
If you also want to profit when price falls, add the short side. A symmetrical crossover system flips the same signals:
Buy   = Cross(Fast, Slow);   // long entry
Sell  = Cross(Slow, Fast);   // long exit
Short = Cross(Slow, Fast);   // short entry (same bar the long exits)
Cover = Cross(Fast, Slow);   // short exit (same bar the next long enters)
Now the system is always in the market - long while the fast EMA is on top, short while it is below, reversing at every crossover. Whether that suits you depends on the instrument and your risk appetite; an index future can be shorted freely, while many cash-market stocks cannot. Start long-only while you are learning, and add the short side once the long side behaves.
You do not have to fill all four arrays. Assign only Buy and Sell for a long-only system and AmiBroker simply never takes a short. The unused arrays default to False (no signal).
The four trade prices
By default, AmiBroker assumes each order fills at that bar's closing price. You can override this with four matching price arrays:
BuyPrice- the fill price for long entries.SellPrice- the fill price for long exits.ShortPrice- the fill price for short entries.CoverPrice- the fill price for short covers.
A common, realistic choice is to fill at the close of the signal bar, which is already the default. In the next chapter we will instead fill at the next bar's open - the honest price you could actually get after a signal confirms - using ValueWhen. For now, just know these four arrays exist and that each one pairs with its signal: BuyPrice belongs to Buy, SellPrice to Sell, and so on.
The trade lifecycle
Putting it together, here is the life of one long trade as the engine walks bar by bar from left to right:
- It scans the
Buyarray. On the first bar whereBuyisTrue, it enters long atBuyPrice. - While the position is open, it ignores further
Buysignals (you are already in). - It watches the
Sellarray. On the firstTrueafter entry, it exits atSellPrice, banking the profit or loss. - The position is now flat, and the engine goes back to step 1, looking for the next
Buy.
The short lifecycle is the mirror image: Short opens, Cover closes. That "enter on one signal, wait, exit on the other" rhythm is the heartbeat of every backtest you will ever run.
A subtle trap lurks here. Cross(Fast, Slow) can light up on several consecutive bars in choppy markets, and a system that fires Buy over and over while you are already long is messy and can mislead the backtest. The raw signals above are correct in spirit but not yet clean. Cleaning them - so each entry fires exactly once - is the entire job of the next chapter.
Try it yourself
- Type the long-only system, Apply it to a daily chart of NSE RELIANCE, and trace by eye where each
BuyandSellwould fire at the crossovers. - Add the
ShortandCoverlines and notice how the system is now never flat - every exit is also an entry on the other side. - Change the EMA periods to
20and50. Do the signals get rarer? Why would a slower pair trade less often? - Comment out the
Sellline entirely and ask yourself: what would a system with no exit rule do once it enters?
Recap
- AmiBroker reserves four array names as trade instructions:
Buy,Sell,Short,Cover. - A signal is a true/false array - one value per bar,
1where the order fires. Buy/Sellare the long pair;Short/Coverare the short pair - each array has exactly one job.- You turn an indicator into a system by pointing these reserved words at a condition, e.g.
Buy = Cross(Fast, Slow). BuyPrice,SellPrice,ShortPrice,CoverPriceset the fill prices (default: the bar's close).- The trade lifecycle is enter-on-signal, hold, exit-on-the-paired-signal - then repeat.
Next, we fix the messy repeating signals - keeping only the first of each run with ExRem, holding position state with Flip, and delaying one bar so the system never repaints.