Risk First: Position Sizing & Stops
Survival comes before profit. Learn the stop-loss, the reward-to-risk ratio and how to size a position so no single trade can hurt you, the unglamorous math that keeps traders alive.
- ·Why risk comes first
- ·Placing a sensible stop-loss
- ·Reward-to-risk ratio
- ·The 1-2% rule
- ·Position sizing from the stop
- ·The math of drawdown and recovery
Ask a brand-new trader what they are working on and they will tell you about getting in: the perfect pattern, the magic indicator, the signal that buys them the exact bottom. Ask a trader who has survived ten years and they will talk about something far less exciting: how little they risk, where they get out, and how they make sure no single trade can ever knock them out of the game.
That is the great flip of this chapter. Profit is optional and unpredictable; survival is required and entirely in your hands. You cannot make the market go up, but you can decide exactly how much you lose when you are wrong, and that one decision, made before you enter, matters more than any signal in this course. We put risk first, because the trader still standing in five years is rarely the sharpest analyst. They are the one who never let a single bad trade end them.
Risk comes first
Most people build a trade in the wrong order. They spot a setup, get excited, buy, and then, maybe, think about where to get out. By then they are emotionally committed, and every exit feels like an insult to their brilliant idea.
Flip it around. Decide the risk first, and let the risk decide everything else. The sequence that keeps traders alive is:
- Where will I admit I am wrong and get out? (the stop)
- How much money am I willing to lose if that happens? (the risk budget)
- Therefore, how many shares can I buy? (the position size, how big the trade is)
Notice that position size is the last thing you work out, not the first. You do not decide "I'll buy 500 shares" and then hope. You decide how much you are willing to lose, mark where the trade is proven wrong, and let the arithmetic tell you the size. Risk is the input; size is the output.
You control three things in a trade, and not one of them is the outcome: where you get in, where you get out, and how much you bet. Master those and the wins take care of themselves. Obsess over the outcome and you will manage none of them.
The stop-loss: deciding where you are wrong
A stop-loss is a price at which you exit a losing trade, no questions asked. It is not an admission of failure. It is the cost of being in the game, like the small bet you must put in just to be dealt cards. Every professional is wrong constantly; the difference is that they are wrong small.
A stop should sit where your reason for the trade is broken, not at some round number that simply feels comfortable. If you bought because price held a support level, a floor it had bounced off before, the stop belongs just below that floor: if it gives way, your reason is dead and you want out. If you bought a dip back to a rising average, the stop sits below the recent low that the dip should not break. The market, not your wallet, decides where you are wrong.
Two cautions from earlier chapters apply directly here. First, support and resistance are zones, not exact lines, so place the stop a little beyond the level, not right on it, so that normal jiggle does not knock you out of a trade that is still valid. Second, remember that oversold can get more oversold and overbought can stay overbought, so a stop is what protects you when a level you trusted simply fails, as levels eventually do.
A stop you move further away to avoid being hit is not a stop, it is a wish. The whole point is that you set it when you are calm and honour it when you are scared. Widening it mid-trade is how a small, planned loss becomes the giant, unplanned one that does real damage.
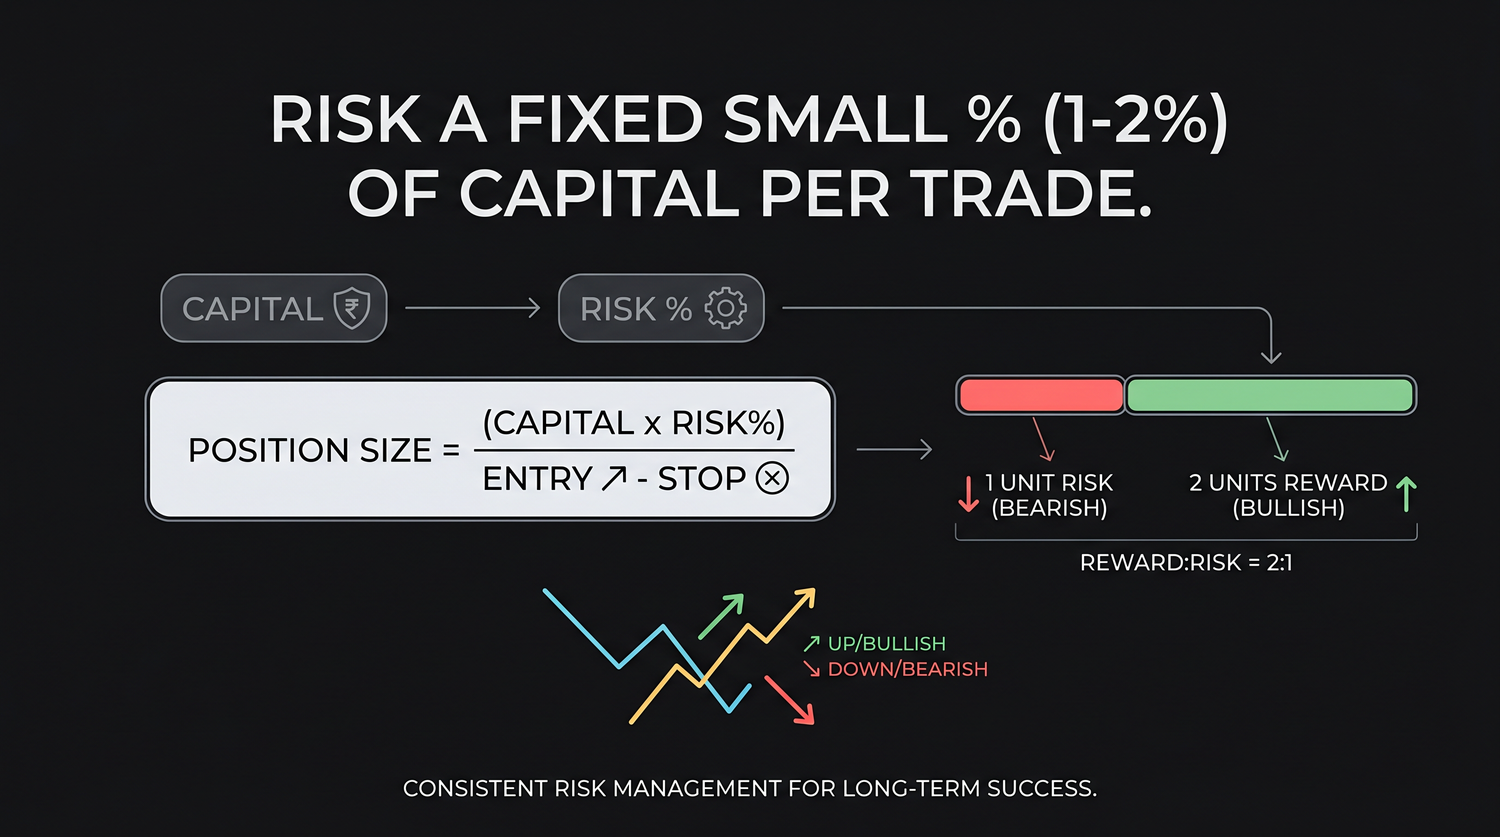
Reward-to-risk: only take trades that pay you to be right
Before you take a trade, measure two distances: from your entry to your stop (the risk, which we will call R), and from your entry to a realistic target (the reward). Divide one by the other and you get the reward-to-risk ratio, how much you stand to make compared with how much you are risking.
Say you buy at 322.8 with a stop at 300; you are risking 22.8 per share. If a sensible target is 380, you stand to make 57.2. That is a reward-to-risk of about 2.5-to-1: you risk 1 to make 2.5. This single ratio is what makes win rate almost beside the point. As the last chapter showed, a trader who wins only 40% of the time but keeps reward-to-risk above 2-to-1 still comes out ahead, because the wins are bigger than the losses. Cut losers at 1R and let winners run to 2R or 3R, and the math works for you even when you are wrong more often than right.
The practical rule: be picky. If a setup only offers a target a hair above its stop, a reward-to-risk below 1-to-1, it is rarely worth taking, however pretty the chart. You would need to win the large majority of such trades just to break even, and few setups manage that.
The 1% to 2% rule
Here is the rule that quietly does most of the work of keeping accounts alive: never risk more than 1% to 2% of your trading capital on a single trade.
Risk, here, means the money you lose if your stop is hit, not the full value of the position. On a 10,00,000 account, a 1% risk budget is 10,000 per trade. That is the most a single trade is allowed to cost you. With that cap in place, a string of losses is survivable and unremarkable: even ten losers in a row, a genuinely awful run, dents the account by roughly 10%, not 50%. You live to trade the eleventh.
Compare that to the trader risking 20% on a trade. Three losses in a row, completely normal, since our backtests showed signals fail more often than they succeed, and they are down nearly half their account, staring at the recovery math we are about to see. The 1% to 2% rule is not timidity. It is what turns a losing streak into an annoyance instead of an ending.
The 1% to 2% is a budget, not a target. You are not trying to lose 1%; you are making sure that if you do, it barely registers. Small, fixed risk is the single habit most strongly shared by traders who are still around years later. If you remember one rule from this chapter, make it this one.
Position sizing from the stop
Now the three pieces snap together into one calculation. Once you know your risk budget and your stop distance, the number of shares is fixed, with no guessing. The share count is simply your risk budget divided by the risk per share, where the risk per share is the entry price minus the stop price.
The arithmetic: 10,000 of allowed loss, divided by 22.8 of risk per share, is about 438 shares. That position is worth roughly 1,41,000, about 14% of the account, yet if the stop is hit you lose only the planned 10,000, your 1%.
The beautiful part is what happens automatically. A tight stop lets you hold a bigger position; a wide stop forces a smaller one, and your money-at-risk stays the same either way. A jumpy stock whose stop must sit far away gets sized down; a calm stock with a close stop gets sized up. You are no longer guessing how many shares "feels right." The stop and the 1% rule decide it for you, and the decision is the same whether you are calm or terrified.
The cruel math of drawdown
Why all this fuss over small losses? Because a loss and the gain needed to recover it are not mirror images, and the gap turns vicious as losses grow. A drawdown, the drop from a peak in your account, of X% requires a larger gain to climb back, because you are now recovering from a smaller base.
| Loss taken | Gain needed just to break even |
|---|---|
| −10% | +11% |
| −20% | +25% |
| −33% | +50% |
| −50% | +100% |
| −75% | +300% |
| −90% | +900% |
Read the bottom of that table and let it land. A 50% loss does not need a 50% gain to recover; it needs 100%, a full double, just to get back to where you started. Lose 75% and you must quadruple what is left. This is the mathematical reason deep drawdowns are so deadly: they do not just hurt, they steepen the climb out to something most traders never manage, and they do it while your confidence is at its lowest.
This is also the real argument for risk management over chasing returns. Recall the last chapter's backtest: the trend filter's median worst drawdown was −47% against buy-and-hold's −56%. From −47% you need about +89% to recover; from −56% you need about +127%. Shaving the drawdown was worth real money on the way back up, which is exactly why a smoother, shallower account curve can beat a higher-returning but deeper one for a trader who has to live through it.
The math of recovery is why the 1% to 2% rule and stops are not optional extras. A trader who never lets a drawdown get deep never faces the brutal end of that table. The whole discipline of risk management is, at heart, a campaign to keep your losses in the top two rows.
Putting it together
A complete, risk-first trade plan, in order:
- Find the setup (context and trigger), using everything in this course.
- Mark the stop where your reason would be broken, below the level and beyond the noise.
- Check reward-to-risk. Is the target at least about twice the stop distance? If not, pass.
- Set the risk budget, 1% to 2% of capital, in rupees.
- Size from the stop: risk budget divided by the distance from entry to stop gives the number of shares. This is the only place your position size comes from.
- Execute and honour the stop. The decision was made when you were calm; follow it when you are not.
Every step except the first is about defence. That is not pessimism. It is the recognition that you cannot control whether a trade wins, only how much it can cost you when it loses.
Quick recap
- Risk comes first: decide the stop and the loss you can accept before the trade, and let those decide the position size.
- A stop-loss belongs where your reason for the trade is broken, a little beyond the level, and never moved further away to dodge a hit.
- Reward-to-risk above about 2-to-1 lets you profit even with a win rate below 50%; skip trades that pay less than they risk.
- The 1% to 2% rule caps each trade's loss so a losing streak is survivable, not fatal.
- Size from the stop: risk budget divided by the distance from entry to stop gives the shares; a tighter stop allows more shares, a wider one fewer, with rupees-at-risk held constant.
- Drawdown math is merciless: a 50% loss needs a 100% gain to recover. Keeping losses shallow is the whole game.
You now have the analysis, the system, and the risk math. One variable remains, and it is the one that breaks most traders: the person carrying out the plan. Next, the last edge, psychology, discipline, and where to go from here.